Saturday 31 December 2011

2011 Crafting Review

2011 has been a busy year! Writing my book at the start of the year and moving house in the autumn took up a lot of my time and energy, but I did manage to squeeze a bit of crafting in here and there...

In January I was finishing writing my book so things were a bit quiet on the blogging front and several posts involved secret things I couldn't show you yet. 


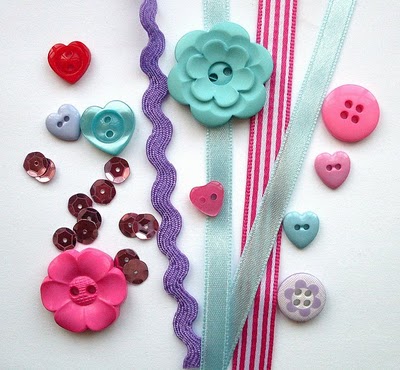
When I wasn't working towards my big deadline, I was knitting blanket squares, restocking packaging and sewing designs that sold out during the busy Christmas season


In February I stitched bows, butterflies and birds...


... and made a ring-bearing owl (which later became this plush felt owl tutorial).


In March, I let the cat out of the bag about my book, Super-Cute Felt!


I also worked on a few more secret things (for something I'll hopefully be able to share with you soon!), got quite excited at seeing my bird brooches featured in Country Living, and shared a few tutorials including one inspired by the Royal Wedding.


In April I tidied up my felt stash, stitched lots of poppies and some primroses, and organised my works in progress.

Here on the blog I had a book week, with lots of crafty book reviews and giveaways. I definitely need to remember to do another one of those in 2012!


In May I shared a tutorial for making a pretty felt flower hairband, and stitched flower garden crowns & lots of sunflowers.


I learned to crochet, and selected colours for my first crochet blanket, and took a bit of time off to enjoy the sunshine and drink tea with good friends.


In June I stitched pink flowers, recycled flowers and needlefelted flowers... and shared an old crafty project of mine to make fun bracelets from felt scraps.

My knitting club had a knitting picnic, and I made lots of progress on my giant granny square blanket.  


I got sent an advanced copy of my book (very exciting!) and spent a few happy afternoons sorting through my stash of clippings and sticking the prettiest ones in my scrapbooks.


In July I shared a tutorial for making butterfly napkin rings, and photos of lots of lovely stuff made by my customers (there's a new Show and Tell post coming soon - if you'd like to share what you've been making from my supplies please do get in touch!). I also stitched lots of cherry blossoms...


... and some secret things which, alas, will have to remain secret for a while yet.

In August, I made a barn owl mask, did some knitting, stitched some lavender sachets and stored crafty supplies in some yummy tins. I also went to the Festival of Quilts for the first time, met up with some lovely crafty chums and oohed over many awesome quilts.


Plus my book was published a few weeks early, which was a very nice surprise!


In September I shared tutorials for making candy cane ornaments and vintage-inspired felt baubles, and was delighted to see my coffee cosy design on the cover of the newly published Stash Happy: Felt.


I also cut out lots of teeny tiny flowers, and knitted lots of mini squares.


The end of September and most of October I was busy moving house, but I did manage to do some knitting and to make some thankyou cards ready for Christmas orders.


It was really wonderful being able to host so many fab guest posts while I was busy moving house (thanks everyone!). I also designed & stitched an optimistic sampler: everything is going to be amazing.


In November I hosted lots of lovely giveaways, met lots of UK makers at UK Handmade's 3rd birthday party, and stitched lots of corsages:


I was also thrilled to have all my work stuff set up in my new studio space ready for lots of pre-Christmas parcel packing. It looks very neat and tidy in my studio tour photos but you should have seen it in the weeks running up to the last posting dates for Christmas - total chaos!


It's looking a bit tidier again now, and I'm in the process of choosing prints to hang on the walls & a few other bits and pieces to make the space feel more personal (hurrah!).

December was very busy work-wise but also quite crafty, with projects using chocolate coins, ideas for making scrap gift tags & fun handmade cards, plus tutorials for wallpaper snowflakes, and felt snowflake coasters & ornaments.


I also got a new furry studio assistant, bought yarn to knit a sky blanket in 2012, stitched some gifts, and relaxed with some knitting including this lovely fluffy scarf which was finished just in time to give to my sister for Christmas.


Thanks to everyone who's left a comment on my blog, or just silently followed my crafty adventures this year! Here's to lots more crafty fun in 2012 :)

Friday 30 December 2011

Five Years on Etsy


Five years ago yesterday, I set up my Etsy shop as part of my New Year's Resolution to try selling a few of the crafty things I make...

My life has changed hugely in those five years. Being self-employed is a lot of hard work but it's also wonderful and exciting, and I'm so lucky to be able to spend so much of my working life doing creative, crafty things.

To celebrate my five years on Etsy, you can get 10% off all orders from my Etsy shop until the end of 2011 with the code HURRAH - just enter the code when prompted during the Etsy checkout process and the discount will be automatically deducted from your order. The discount excludes shipping, but it includes items already on sale... and I've just added a whole bunch of new things to my sale section to make room for new projects in 2012.


P.S. if there's anything you've ever wanted to ask me about my business or about selling your work online, now's your chance! Add your question to this Etsy forum thread and I'll reply as soon as possible :)

Monday 26 December 2011

Happy Christmas!

Hope you're all having a lovely Christmas / whatever else you get up to at this time of year :)

I didn't decorate much this year, just displayed cards from friends, but there are lots of felt decorations made by me on my mother's Christmas tree...


... including a felt snowflake, and the gingerbread house ornament I designed for Fa La La La Felt.

I also made her a set of felt gingerbread ornaments using the Gingerbread Cookie Garland pattern in my book, Super-Cute Felt.


Friday 23 December 2011

Last Minute Crafting

I'll be keeping my shops open during the next few weeks, and posting parcels when I can (i.e. when my local P.O. is open).

I'm going to be doing my best to keep my working hours to a minimum though, and to generally try hard to wind down and chill out after the busy pre-Christmas selling season. After weeks of rushing to meet posting deadlines and working long hours packing parcels, sewing and replying to emails, it will be very nice to just relax in front of some festive telly... with my knitting, of course!

I've got a few last minute Christmas gifts to finish knitting and stitching, and I've also started knitting a cosy cowl for myself from some skeins of lovely soft yarn I bought earlier this year:


The yarn varies in thickness and is a blend of mossy greens, with a thread of gold running through it. I've never made a cowl before but am just winging it and hoping for the best :)

Thursday 22 December 2011

Guest Post: DIY Seasonal Switch Plates

With Christmas just around the corner, here's one another festive guest post for you! Today's post comes from Alex Cobbe, aka Hydrangea Girl...

-------


My name is Alex and I'm addicted to all things design. I also have a fascination and passion for crafting, cooking, kitties, and anything quirky, unusual, or out of the ordinary.

I love Christmas and that warm fuzzy feeling that goes along with it. I love decorating for the holidays, and what made me come up with the idea for these decorated switch plates was that there aren't many Christmas decorations that you can apply directly to existing parts of your home. There are many hanging decorations, and decorations to drape across things, but nothing that would add a certain 'je ne sais quoi' to that big bare patch on your wall that just has a light switch. Does that make sense? In my head it does. So anyways, on to my tutorial!

What you'll need: a cereal box or supermarket pizza box (thin cardboard works best), paint in a range of colors, PVA glue, glittery things of your choice like snowflakes or stars, scissors, paint brush, a black pen, pencil, and a ruler.


Step 1: decide on a template for your seasonal switch plates. I designed a silhouette inspired a little by Russian architecture. I drew my template on a folded piece of paper - when I cut out the design and opened it, it was a perfectly symmetrical template. I also cut out a square the size of my light switches. To make sure the templates fit each switch snugly, I fitted and trimmed the inside square with a pair of scissors (scalpel or exacto knife) where necessary.

Step 2: with your pencil, draw a Christmassy scene. I went with a different design for each switch plate, but there's no harm in doing the same pattern en masse.

Step 3: once you're happy with your design, paint it in. I began with the gold background, which I needed to build up with two layers of paint. Once the gold was dry, I went ahead and painted the remainder of the scene.


Step 4: When your paint has dried, use a black pen (or fine marker) and draw an outline around your design to really make it pop!

Step 5: attack every boring light switch in your home.


-------

You can check out lots of other crafty tutorials over on Alex's blog, Hydrangea Girl, her dust cover project is especially fun and would be a lovely way to add a personal touch to a book you're giving as a Christmas gift.

Fancy some more free crafty ideas? Subscribe to my newsletter for a monthly free pattern and visit my crafty tutorial archive for lots more free projects.

Visit my shop to buy my printable PDF sewing patterns:

Wednesday 21 December 2011

A Project for 2012

My 2011 crafty resolutions didn't really work out as I got distracted by too many other new exciting projects to find the time to finish the two blankets and a quilt that I'd rather foolishly set myself the challenge of finishing this year. I reviewed a book about quilting and knitted a few blanket squares but that was about it!

So for 2012 I've decided to pick one big project to work on alongside all the other crafty projects that come and go throughout the year: knitting a sky blanket.


I read about Lea Redmond's awesome Sky Scarf knitting project earlier this year and basically I fell head over heels in love with the idea and couldn't get it out of my head. I loved the idea of knitting a row every day based on the colour of the sky, and of ending up with a quirky knitted record of a year's worth of weather.

I thought about following her instructions to make my own scarf, but I didn't really want to knit a long scarf I knew I'd probably never use... so I decided to make a blanket instead. 

I'll be knitting a square a day for almost a year (360 days in total, giving me a nice even number of squares to sew into a blanket), using two strands of double knit yarn for each square.

Lea's scarf pattern uses the genius idea of mixing five basic sky colours (light blue, bright blue, light grey, dark grey and white) to represent the sky for that day... so a bright sunny day with a few fluffy clouds would be bright blue and white, and a day of heavy snow would be all white. I've already been enjoying looking at the sky each day and working out what yarn colours I'd choose for it.

My blanket will end up being very thick and cosy, perfect for snuggling on the sofa on winter evenings. You can see my test squares here. The squares will look very different to the stripes of Lea's scarf, but hopefully it will still look nice and even if it ends up being the ugliest blanket in the world I will probably still love it madly and spend hours waffling on at people about the idea behind it (honestly I have bored so many people by telling them about this project, and I've not even started it yet!).

It took me a while to find a range that had a good selection of sky blues and cloudy greys, but I eventually settled on Stylecraft Special DK which comes in a massive range of colours and (added bonus) is pretty cheap, so I could afford to buy extra balls of it to cover all weather eventualities during the year. All the leftover yarn at the end of the year will go into my stash for other blankets, etc. and get used up eventually.

In case you're interested the colours I'm using are (clockwise from top left) "Silver", "Aster", "Cloud Blue", "White", and "Grey". 
I will (of course) be posting pics of the blanket's progress during the year - I hope you'll enjoy following it as it grows :) 

Saturday 17 December 2011

Photos from a Busy Week

The Christmas posting deadline for UK orders is looming ... please place your order by the end of this weekend if you want your parcel posted before the last posting date!

The last few days of the pre-Christmas season are always pretty hectic. I've kept meaning to blog but kept forgetting - or forgetting to charge my camera batteries / take photos when it was sunny / etc.

So, here are a few catch-up snaps from this week :)

I've been using a yummy new tin to store my current works-in-progress:


It's shaped like a giant bourbon biscuit... I didn't get to eat the biscuits that were inside it originally, but my mum remembered that I had the matching giant custard cream tin and saved the bourbon biccie tin for me. What a star.

Also very yummy - some Charley Harper goodies I treated myself to this week. I saw the gorgeous gift wrap over on What Katie Does and just had to buy some for myself... and couldn't resist buying a few more Charley Harper bits & pieces from Fred Aldous while I was at it. A girl can never have too many things with Charley Harper birds on, right?? 


Talking of What Katie Does, I am rather in love with her new Tea & Books themed print:


The print is available from her Etsy shop, HERE. I may have just ordered one for my new studio...

A nice bit of surprise post arrived yesterday from the nice people at Folksy - a copy of their winter sampler, a mini newspaper with news from Folksy and a gift guide of some of the lovely handmade things for sale on the site.


They also included a rather lovely knitting-themed postcard... I don't know who designed it, but it's quite gorgeous and perfectly suits their new "Modern British Craft" tagline. 


In crafty news, I've made a start on sorting out the pieces for the vintage felt bird ornaments ready for some Christmas crafting... 


... and I've started knitting a very soft and fluffy scarf from some fun faux-mohair yarn:


I bought a whole bundle of this fluffy yarn at my old knitting club's fundraising yarn sale this summer. I didn't have a plan for what I might make with it, but it turns out that two strands knitted together makes a fab chunky knit that's perfect for scarves... plus knitting on those large needles is so quick and easy, it's such a satisfying project for the winter evenings. 

Right, I'm off to eat some home-made mince pies now (my dad bakes a mean mince pie) and do some more knitting...

Tuesday 13 December 2011

How To: Felt Snowflake Coasters & Ornaments

This project was inspired by traditional paper snowflakes.


It started out as a tutorial for snowflake ornaments, and then when I was making them my mum said "oh, are those coasters?"... so of course I just had to make some snowflake coasters too!


To make your snowflakes you will need:
- thin white felt
- black felt
- matching sewing thread
- a sewing needle & sharp sewing scissors / embroidery scissors
- circle templates
- plus narrow black ribbon if you want to make your snowflakes into ornaments

1) Make templates for your snowflakes by drawing around glasses or other small circular things... or use the coaster template provided at the bottom of this post... which will be uploaded as soon as I can remember where I put it last week! (oops!) In the meantime you could draw around a circular coaster you already own.

2) For each snowflake you want to make, cut out one white felt circle. Pin your paper template to the felt and cut around it carefully. Then remove the pins and set the template aside.

3) Fold your circle and cut shapes into it, in the same way you would when making paper snowflakes.The thinner your white felt the better, as you can fold and cut it more easily. I used the white wool blend felt from my shops which folded into quarters with no problem.

I folded each circle into quarters (folding twice), cut the point and then cut simple shapes along each side. Triangles work really well, and your designs don't have to be complicated to look really effective! Then I unfolded it and refolded it along the not-yet-cut sections of felt and cut more shapes along the sides and around the outside edge too. Hopefully if you've ever made a paper snowflake before that will make sense :)


4) Pin your finished snowflake onto a piece of black felt. Use white thread to stitch the snowflake onto the black felt... use single stitches wherever you need to hold the snowflake in place.


5) Then carefully trim the black felt with a pair of scissors, so you're left with a narrow border of black felt around your white snowflake.

6) Use the black circle you've just cut out as a template to cut a second matching piece of felt.


7) If you're making baubles, this is when you need to cut a length of ribbon (about 5inches long), fold it into a loop and and sew the ends in place at the top of your black backing circle. If you're making coasters, you can skip this step.

8) Finally, sew the front and back pieces together with black thread. I used running stitch for this, but you could also use whip stitch or blanket stitch if you prefer.


If you're making ornaments, sandwich the ribbon ends between the layers when you sew them together so they're hidden inside your ornament.


This tutorial is for non commercial use only: you can use it for as many snowflake ornaments or coasters as you like for yourself or as gifts for friends but please don't make any for sale. Please feel free to borrow photos if you want to blog about this project, but remember to credit me and link back to the original source, and do not reproduce my entire tutorial on your site. Thanks!

Enjoyed this free tutorial? Buy me a "coffee" and help support my blog!

Buy Me a Coffee at ko-fi.com

Subscribe to my newsletter for a monthly free pattern and visit my crafty tutorial archive for lots more free projects.

Visit my shop to buy my printable PDF sewing patterns:

Monday 12 December 2011

Test Squares

I knitted a few "test" squares yesterday...


... choosing knitting needle size / number of stitches / etc for a new blanket I'm planning to knit in 2012.

More details will be blogged when my yarn arrives! :)

Saturday 10 December 2011

Ideas for Making Handmade Cards

Writing yesterday's gift tag "how to", I remembered how I used to make birthday cards in the same style when I was a teenager.

They were an awesome way to use up scrap crafty stuff / make use of all those bits of fancy paper and shiny foil that were too pretty to be thrown away... and because they involved using scraps, each card ended up being slightly different.

To make your cards...
1) Choose an embellishment like a fancy sequin or a button
2) Stitch it to some pieces of felt to frame it, completing your card "topper"
3) Then add more layers of coloured paper/foil/giftwrap from your stash
4) To assemble the card, first glue the layers of paper onto your card blank, then use craft glue or double sided tape to attach the topper to the card.

Here are a few old snaps I found of some cards I made in this style many years ago...


Combining plain coloured papers with a bit of fancy holographic / other interesting metallic gift wrap or card works really well - a small bit of sparkle goes a long way!

You can also make card toppers just using felt scraps and paper, no extra embellishments required.

Stitch together pieces of felt in a simple geometric design, and then "frame" the topper with a coordinating rectangle of paper or card.


I also loved to make handmade Christmas cards, picking a new theme every year and spending several happy hours making them all (oh to have the time to still do this!). I used these simple geometric designs for my cards one year, making all my cards in a colour scheme of gold, denim blue and brown.


I used gold sequins and beads from an old broken necklace, gold and blue felt scraps, gold card, bits of shiny gold fabric, scraps of denim from an old pair of jeans, blue sugar paper (construction paper) and bits of rough brown paper cut from used envelopes.


Brown paper is one of those love-it or hate-it things... I love a parcel wrapped in brown paper, and adore the contrast between its plainness and any sparkly ribbon added on top, but I know it's not for everyone! You can of course adapt any of these ideas to your own favourite colours :)

Please feel free to borrow one or two photos if you want to blog about this project, but remember to credit me and link back to the original source, and do not reproduce my entire tutorial on your site. Thanks!

Enjoyed these card making ideas? Buy me a "coffee" and help support my blog!

Buy Me a Coffee at ko-fi.com

Subscribe to my newsletter for a monthly free pattern and visit my crafty tutorial archive for lots more free projects.

Visit my shop to buy my printable PDF sewing patterns: